In the last five years, cloud data solutions in general, and Snowflake in particular, have gained adoption at stunning speeds, with Snowflake customers now running a combined five billion queries every day. But as we often see with exciting new tech (this year’s AI boom being another example) security and governance tend to move a little slower than adoption.
Even now, many organizations are trying to manage access to huge and complex Snowflake implementations, spanning thousands of users and hundreds of thousands of objects, with the same set of tools and processes they used back in the on-prem era: single Sign-on (SSO) provided by Okta or Azure AD, permissions governed by role-based access control (RBAC) and either completely manual processes or legacy IGA tools to manage compliance. This approach has some important limitations:
- RBAC is governance by shorthand. IAM and GRC teams have to trust that the name of a role accurately describes the permissions it grants. Visibility into the actual access outcomes of assigning a role is minimal.
- Teams have no systematic way of tracking whether users and roles actually use the permissions they have. Without insight into activity, there’s no way to meaningfully apply the principle of least privilege.
- Legacy IGA processes are designed to look at one identity at a time, with each identity receiving similar levels of scrutiny. Meanwhile the number of human identities interacting with the Data Cloud is much higher than in the on-prem era, and that’s without considering machine identities, which now outnumber humans in the cloud by 17:1.
As a result, any organization making use of the Data Cloud has probably taken on significant technical debt around identity security and access control. Let’s call it “access debt”. In Snowflake, access debt can show up in a number of ways:
- High numbers of super-privileged users, either in terms of the actions they can perform (ability to delete data) or in terms of the amount of objects they can access. These “superusers” often don’t possess any role explicitly marked as “ADMIN”, so they’re hard to identify, and when compromised by an attacker, they allow for catastrophic data breaches and ransomware attacks.
- Bloated RBAC implementation with a high proportion of roles to users, redundant roles, and dormant or barely used roles.
- Deep role hierarchies that further obscure the access users have and can impact the performance of your queries.
Recently we blogged about how you could use Veza to restore visibility into the true permissions of identities in Snowflake. Now, let’s take it a step further and look at how we can use that visibility to support role mining: analysis of your RBAC system and the relationships between roles and users in Snowflake. Use these practical techniques to establish the principle of least privilege in your Snowflake RBAC, and establish a new set of best practices going forward.
Step 1 – Flatten excessive hierarchies
Role hierarchies aren’t inherently bad. Nested role structures allow you to manage access across multiple dimensions of your business, like department, management structure, and geographical distribution. However, each additional layer of nesting adds cost:
- Performance impact: Deeper hierarchies lead to longer query times and higher spend.
- Access complexity: It becomes challenging to manage access permissions, especially when roles are nested deeply. Manually tracing an 8 or 9 step role path isn’t scalable.
- Risk of errors: There is significant risk of human error. For instance, inadvertently assign the wrong role deep within a hierarchy and suddenly all of your marketers are now admins. This kind of error might go unnoticed for years, or until a security incident occurs, like a phishing attack targeting your marketers.
For these reasons, it can be a good idea to establish a maximum acceptable depth of nesting for your role hierarchies. The acceptable depth will change based on your specific requirements, but you need a way to flag non-compliant role hierarchies and split them into multiple shallower hierarchies.
With Veza you can query all Snowflake access by path length. This allows you to identify all role hierarchies deeper than your maximum acceptable depth. Veza can also monitor changes to the results of this query and alert you of new non-compliant role hierarchies as they appear.
Step 2 – Define, identify, and trim super-roles and super-users
Super-roles and super-users are roles or users with a high level of access to objects in Snowflake. What counts as a “high level of access” is going to depend on how big your Snowflake implementation is, the sensitivity of data you store, and how your RBAC is structured, so you first need to be able to define what a super-role or super-user is to your organization. There are multiple dimensions to consider when defining these concepts, including the number of objects a role or user can access, the type of access (can they just read, or write and delete?) and how sensitive or critical the data is. But a simplified example of a super-role might be a role with any of the following:
- Access to more than 33% of the total schema
- “Delete” access to any object
- Any type of access to the CUSTOMER, INVOICE, or PAYROLL tables
One important thing to note is that a super-role doesn’t need to be called ADMIN or be marked by any particular naming convention. Roles can become highly privileged by accumulating access to a large number of objects, or through role hierarchies. By the same token, a user can become a super-user by combining the privileges of more than one role. What matters is the “blast radius” of the user. That is, the level of access an attacker could potentially gain by compromising that user’s identity.
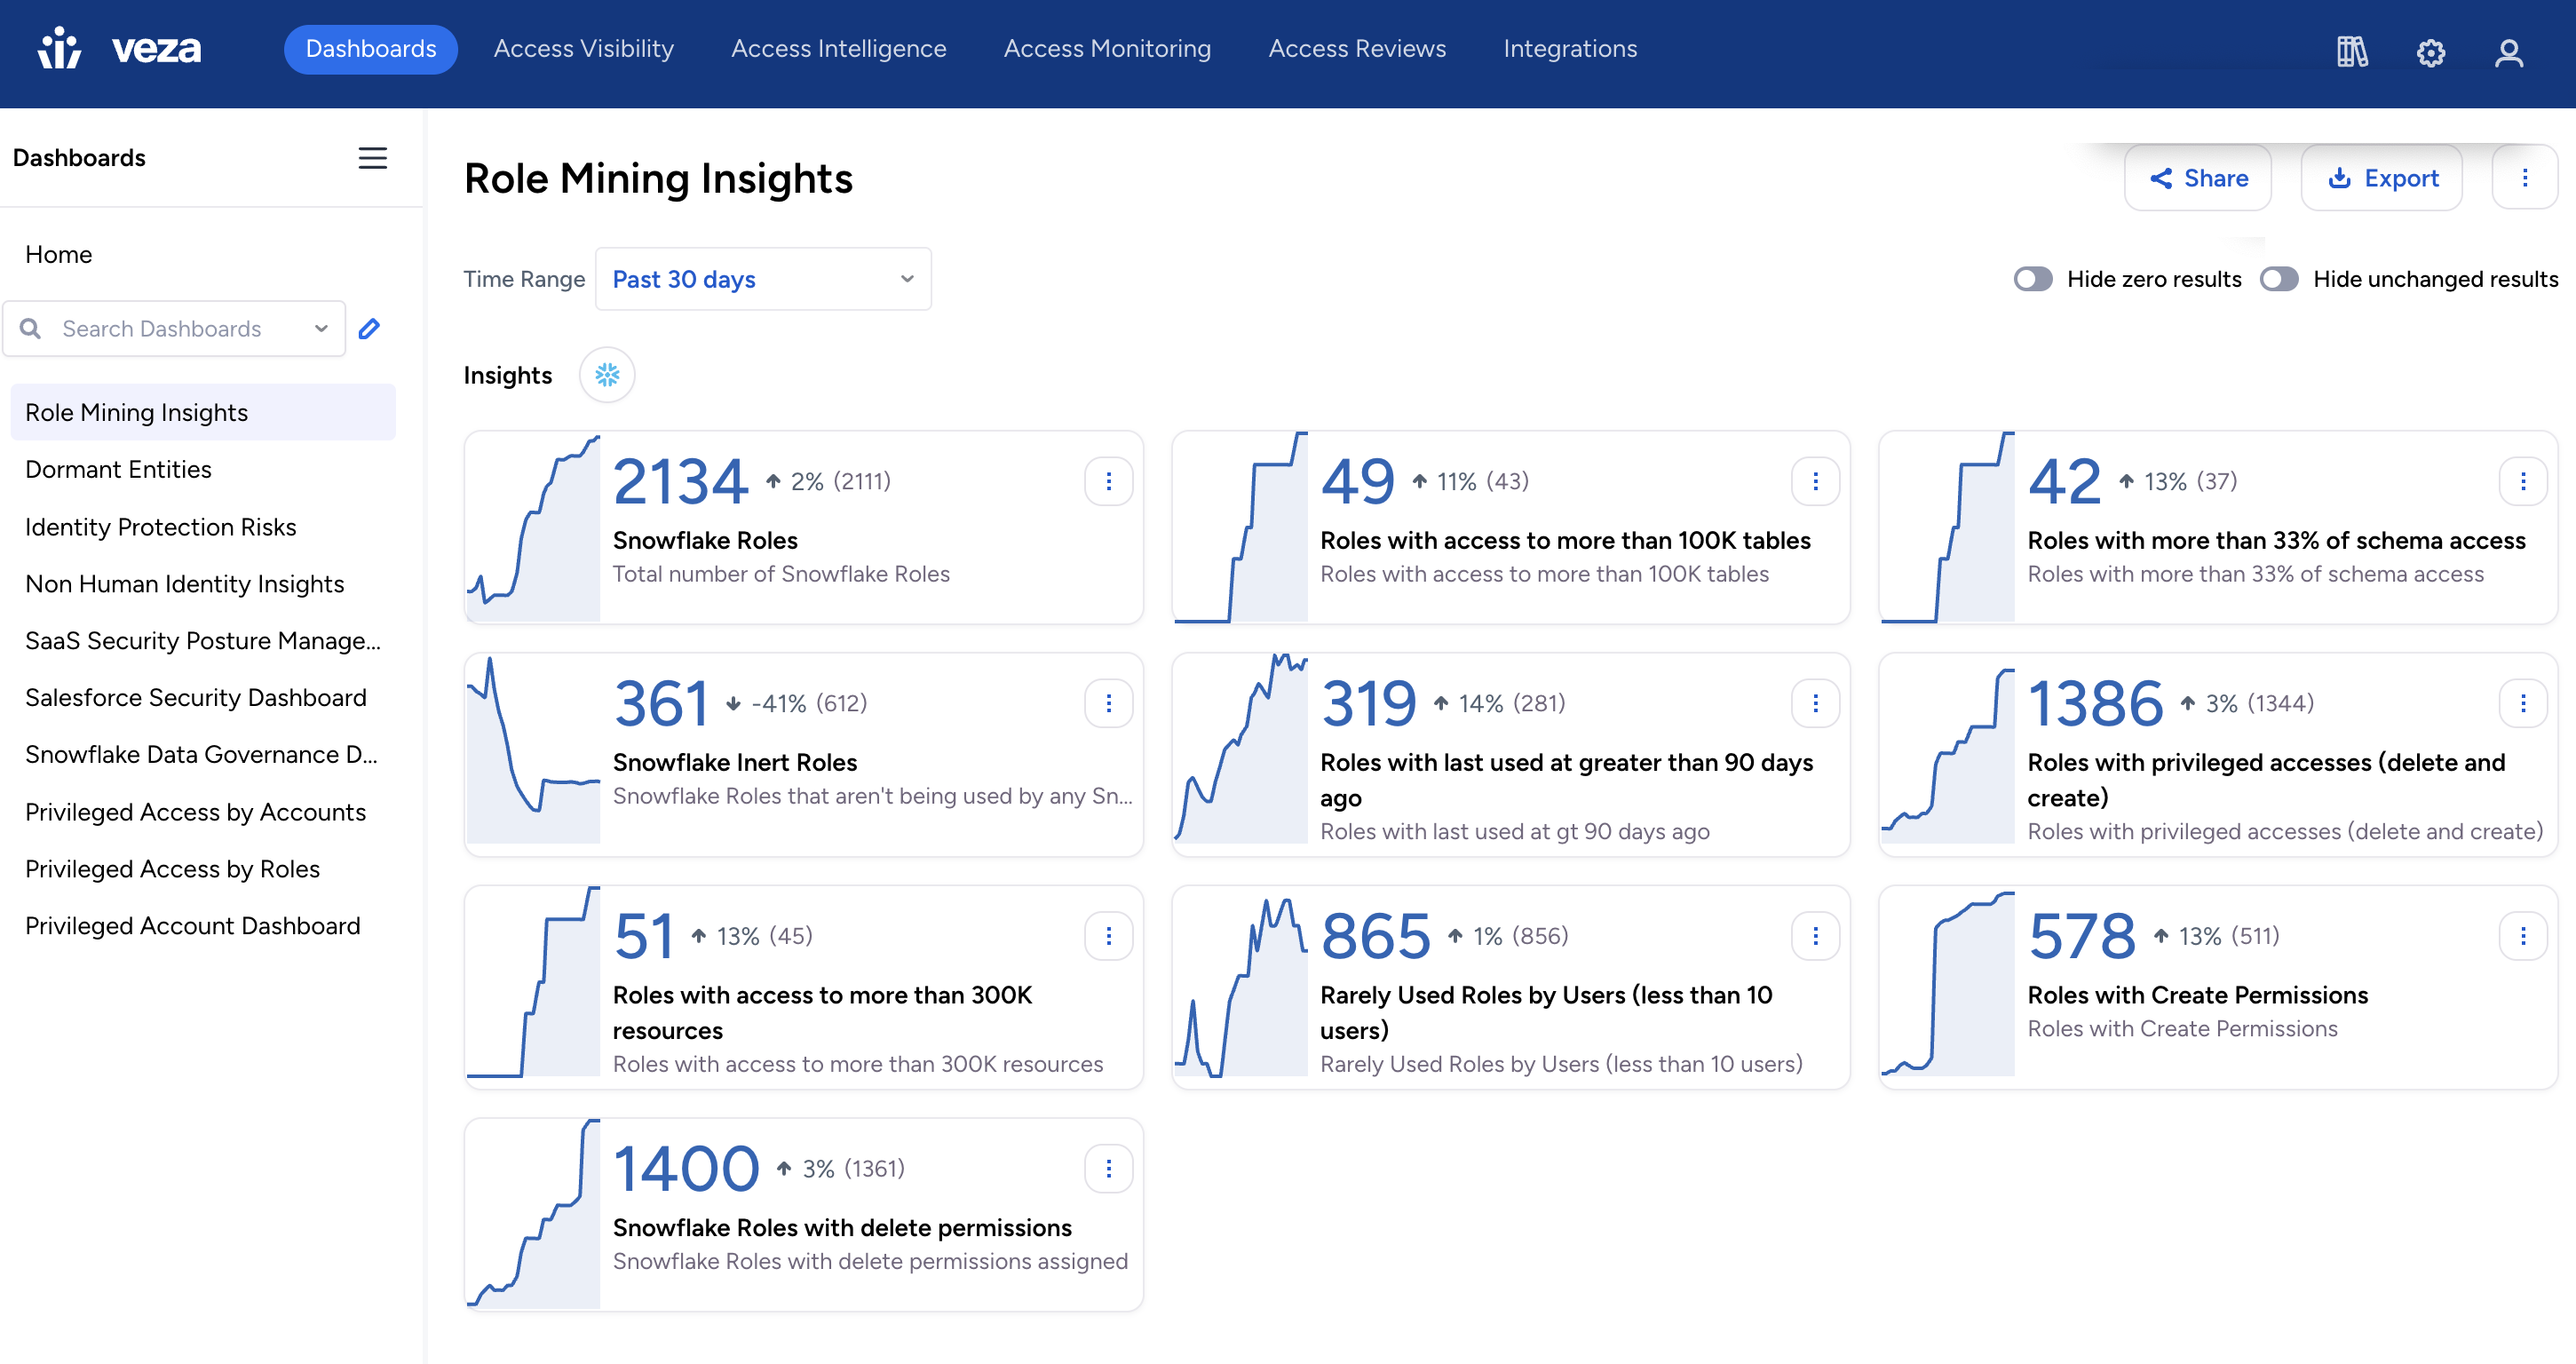
With Veza, you can easily query for any of the above types of access. This both helps you workshop your definitions of super-roles and super-users, and then to identify all roles and users that qualify. For example, this section of our role-mining dashboard includes reports that surface all roles with access to more than 33% of tables, all roles with delete access, and all roles providing access to critical tables.
Now that we’ve identified our high blast radius users, we can start to manage the risk they present. For example, create an access review campaign targeting all of your super-users to figure out how much of their access is really needed, and review all super-roles to remove roles that are duplicative and make sure that the remaining super-roles are assigned only to users who need them.
Step 3 – Remove dormant users and unused roles
As your number of Snowflake roles grows in relation to the number of users, the level of usage you get out of each role decreases. A common feature of access debt is a glut of either unused or barely used roles. Dormant and underutilized roles come about in a number of ways:
- Roles created for project-specific access aren’t removed when the project wraps
- Employee turnover leads to roles with no users and IAM teams don’t have insight into the original purpose of the roles and don’t remove them.
- IAM teams are wary of assigning existing roles to users in response to access requests due to a lack of visibility into the extent of the permissions they would be granting, so they create new roles, leading to a lot of roles with only a single user.
Ideally, for an enterprise implementation of Snowflake your users would easily outnumber roles, each role would have a clearly defined business purpose, and the number of roles with only one or two users would be low.
With Veza, the insight into granular privileges provided by the Access Graph, combined with Activity Monitoring to determine what privileges are actually used, allows you to easily identify and remove:
- Roles with no active connections to users or objects
- Roles with unused privileges
- Roles with only a small number of users
- Users with little or no activity on Snowflake objects
Step 4 – Establish best practices for access requests
If you’ve followed through so far, then you have a great head start on cleaning up your RBAC in Snowflake and paying back your access debt. You might even be in a place where you can use phrases like “least privilege” without laughing. Now it’s time to start changing the behaviors that put you in debt in the first place. As discussed above, a key reason that underutilized roles multiply is that IAM teams struggle to choose appropriate roles when responding to ad hoc access requests. To prevent underutilized roles from creeping back into your RBAC, you need a way to confidently select a least privileged role to grant any access request. Veza’s Role Recommendations give you just that.
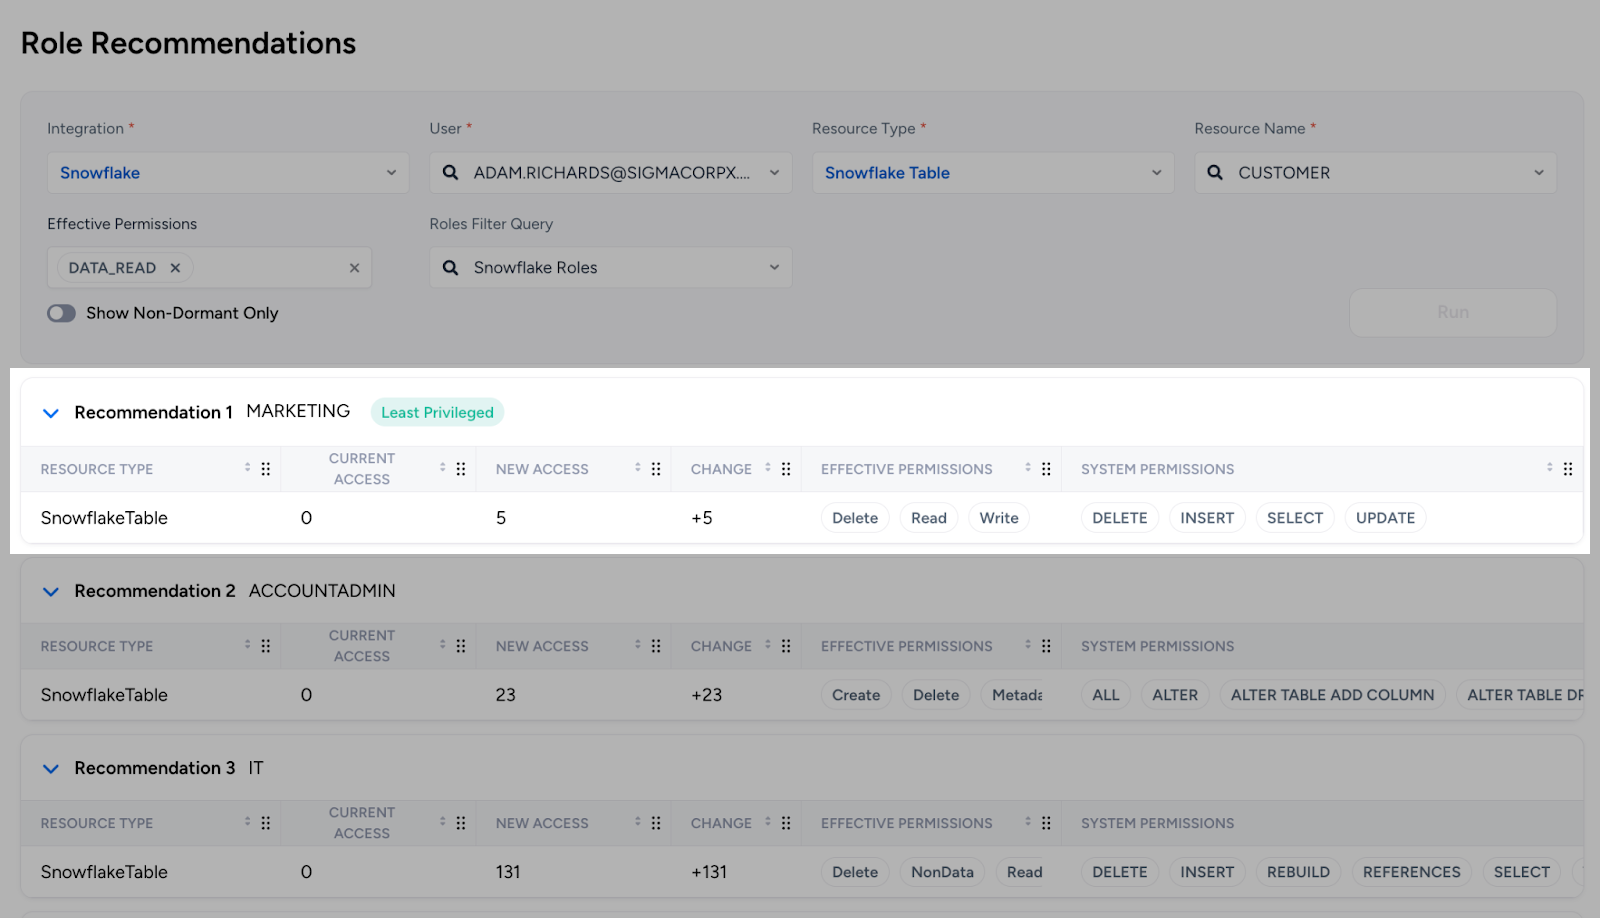
Let’s say Adam requests read access to the CUSTOMER table in Snowflake. Veza analyzes all available Snowflake roles and recommends the role that grants Adam the access he needs, while adding the smallest possible number of new resources. Instead of being blind to the true amount of access they’re granting, your IAM teams can be confident that they are enabling their stakeholders fast while also following the principle of least privilege.
What’s next? – Leverage AI for advanced RBAC optimization
By now you’ve made great strides in cleaning up your RBAC for Snowflake, and you’ve established some best practices to keep it pristine going forward. But new technologies will offer you even more ways to improve your access governance in Snowflake.
We’ve already seen how the unprecedented visibility into granular permissions you get from Veza can help identify over-privileged roles or users. This year, we’ll be releasing AI-based optimization capabilities for Snowflake and other systems to help you:
- Identify and consolidate roles that have substantially similar privileges.
- Reveal and investigate any access outliers by department, title, geography, and more.
- Determine optimum role assignments for any user based on past activity.
- Optimize your overall role structure towards minimizing risk, right-sizing access, or improving performance.
Ready to get started?
To learn more about how Veza can help you clean up your RBAC and achieve least privilege in Snowflake, sign up for our free risk assessment or schedule a demo today.